Appearance
Export GC → Import TP
GC has the ability to generate Excel spreadsheet that can be imported into both TP-T1 and TP-T2. The file that is created is temporary and can be deleted sometime after the import is complete.
Regardless of importing into a T1 or a T2, the following steps are required to be completed before you can successfully import into TP.
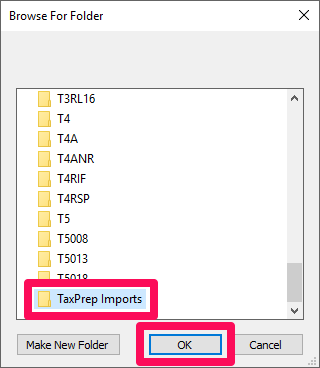
- Setup a folder on your desktop or a location of your choosing. Name it something like TP Imports or whatever works for you so that you can easily identify it.
- Open GC, under application settings click TP Export Location.
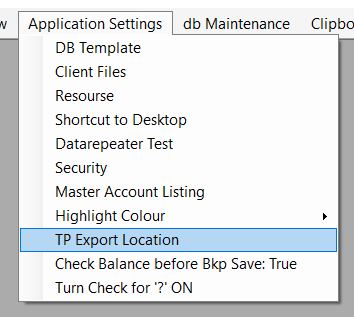
- Find your import folder and click OK.
NOTE: You will will need to repeat steps 2 & 3 after every GC update.
Directing TP Import File to T1 or T2
GC determines that a TP export is intended for a T1 or T2 is by the Entity configuration. If the entity is setup as a Proprietor or Partnership it will configure the import file for T1s. If the entity is setup as a Corporation it will configure the import file for T2s. 
Getting Started
The Export feature in GC is located in your Reports window.
Click on the TP Export button. This will load the export window. 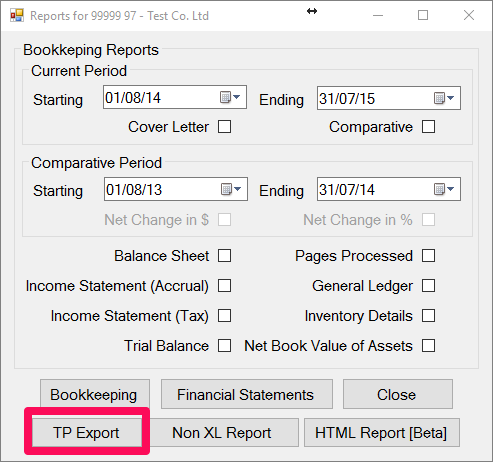
In most cases you will be presented with a table that has only the account name and balance entered. ![]()
However, if your file has some saved coding you remove them by clicking Codes in the menu bar and then clicking Clear all. ![]()
It's important to clear the codes as some codes may change from year to year depending on the client's situation (e.g. GST may be payable one year then recoverable the next).
If you want to save yourself the hassle of doing the same thing on this file next year click File and Save. This may take a little time (depending on the amount of accounts) but you will be prompted when this is complete. WAIT FOR THIS NOTIFICATION BEFORE CONTINUING!
With your codes clear you're all set to begin.
Importing into TP-T2
There are two main differences between an export file for a T2 vs a T1:
- The balance sheet information is transfered for T2s and not T1s (T1s strickly report income statement information).
- The income statement information will either be for an accrual business or a farm. This differs from a T1 in the respect that for a T1 the income statement can be for an accrual business, farm statement or a Agri-Invest application.
You will see a little later how to reassign TP import codes with the accounts in GC. For corporations its important to note that whether a division is Commercial, Commercial Rental or Residential Rental - which will all be assigned coding for non-farming businesses (schedules: G8299, G8518 & G9367). Likewise for Agricultural or Agri-Invest - which will be assigned the coding for the farming statements (schedules: G9659 & G9898). The reason that there is all of these selections is for the T1 import coding because there are more schedules provided in a T1 for reporting these different types of income.
- Click Codes and Apply Defaults to Blanks, GC will do it's assigning import codes to the accounts. If it's unable to guess what code should be assigned it will leave the TP Field and Code blank.
- By design, it will not populate the TP coding for retained earnings. By default, TP will pre-populate opening retained earnings in the GIFI. Therefore not importing it will ensure accuracy of the GIFI information in TP.
- Scan the table for import fields that don't match the account and for negative balances. Commonly there are mismatches with 5854 accounts, where this account is used for, as an example, Travel. There are also some cases when having a negative balance is ok. For example Closing Inventory for a farm. When reporting the accrual portion for inventory on a farm, TP just requires the net change in inventory and reports it as part of the expenses (the adjustment is Opening Inventory less Closing Inventory). You will notice that on a farm the TP coding for opening and closing inventory are the same. This is important because as with all matching TP coding, GC combines them when compiling the TP import file (and this is also why there could be other situations why it would be okay to have a negative balance - it may be combined with another account with a positive balance).
- To change the code, double click the offending row to launch the TP Code library window. You can either scroll through the list or use the Search field and click apply (the latter is my personal preference). Select the code you're looking for and click the Select button.
- If GC was unable to assign a TP code to an account, you will need to select one using the method above. GC will ignore any accounts that do not have a TP code and it will excluded from the import file. Once you have selected an account you will need to update TP business ID. this is the number that would normally appear in the square brackets (it will currently show as a '*'). 99.99% of the time this will be the number 1, the only time this would be different is if there are more than one division of the same type (more than one farm division or more than one accrual division). If this is the case you will need to increment up according to the division number.
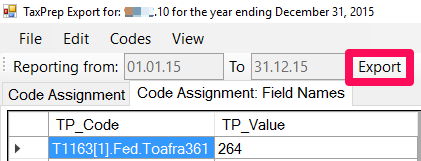
- Once you have updated and added all your TP codes you're ready to Export. Do this by clicking the Export button.
Your Import file will display, go ahead and close it. If you're prompted to save it, save it and it will be waiting for you in the folder that you previously setup.
Now you're ready to Import into TP!
TP Importing for T1s
As stated earlier, with T1s you won't be importing any balance sheet items but you will need to ensure that you're coding for the correct statement. Again as stated earlier, this is driven in GC by the division type (for entities that are either proprietor or partnership).
- Commercial - T2125
- Rental: Commercial - T2125
- Rental: Residential - Not Supported (you will need to manually enter)
- Agricultural - T2042
- Agri-Invest - T1163

Just like with T2s you will need to clear the previously stored import codes. The process is the same.
Unlike with T2s, not all the form fields are hard coded. For example, allowable income or expenses, when you're doing a T1163 require a commodity code associated with the amount or if you're doing a T2042, there is no dedicated field for Meals & Entertainment or if you're doing a T2125, there is no dedicated field for Bank Charges so in both these cases a corresponding description field is required. Although these complicate the process GC as a feature that will associate these for you. The instructions for this will be provided later on.
It is important that you are familiar with T1163, T2042 & T2125 otherwise ensuring that the proper account codes are selected will be challenging.
- Click Codes and Apply Defaults to Blanks GC will do it's assigning import codes to the accounts. If it's unable to guess what code should be assigned it will leave the TP Field and Code blank.
- Scan the table for import fields that don't match the account and for negative balances or zero balances. Zero balances may generate an unnecessary description field update, the best practice is to remove them. Do this by selecting the offending row and hit Delete on your keyboard. Commonly there are mismatches with 5854 accounts, where this account is used for, as an example, Travel. There are also some cases when having a negative balance is ok. For example, when you want to combine accounts and its okay to reduce one by the other. If this is the case, ensure that the TP coding is the same for these accounts.
- To change the code, double click the offending row to launch the TP Code library window. You can either scroll through the list or use the Search field and click apply (the latter is my personal preference). Select the code you're looking for and click the Select button. The library should default to the library of codes for the division type.
- If GC was unable to assign a TP code to an account, you will need to select one using the method above. GC will ignore any accounts that do not have a TP code and it will excluded from the import file. Once you have selected an account you will need to update TP business ID. this is the number that would normally appear in the square brackets (it will currently show as a '*'). 99.99% of the time this will be the number 1, the only time this would be different is if there are more than one division of the same type (more than one farm division or more than one accrual division). If this is the case you will need to increment up according to the division number.
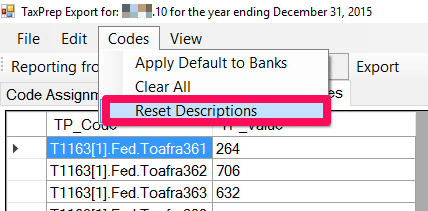
- Once you've finished assigning all the TP coding to the balances, you're ready to Reset the Field Names. Click the Code Assignment: Field Names tab

- Now go to and click Codes/Reset Descriptions. This will update the descriptions for other income and expense accounts. Even if you didn't make any changes this should be done (if anything to build the habbit).
- After all the Description TP codes have updated you're ready to Export. Do this by clicking the Export button.
Importing into TP
Importing into TP is the same process whether you're importing into a T1 or a T2.
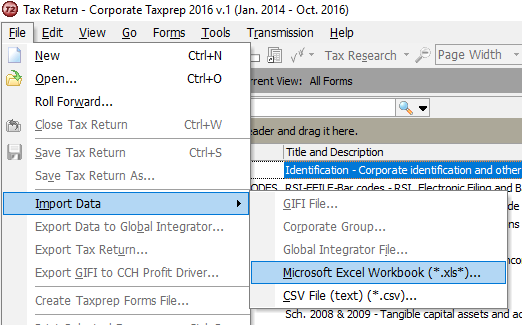
- With the file you're working on loaded in TP, go to File/Import Data/ Microsoft Excel Workbook (.xls)...
 2. Select your import file. 3. You will then be asked if you want to import into the active return - Click YES. 4. TP will then notify you if there was any errors or if the import was successful. If there are any errors TP will tell you where.
 WAY TO GO! You're done.